Deploying Jakarta EE 9 applications with WildFly Bootable JAR
Since WildFly 21 was released, it is possible to build your application and the WildFly runtime into a single fat JAR file through the new wildfly-jar-maven-plugin . For developers, through this maven plugin, it brings the well-known Spring Boot building progress to Jakarta EE/WildFly world.
Prerequisites
Make sure you have installed the following software.
- Java 11 , OpenJDK or AdoptOpenJDK
- Apache Maven 3.6+
- WildFly 24.0.0.Final, please download the Jakarta EE 9 preview distribution
- OpenShift CLI
Building a Bootable JAR
Firstly add wildfly-jar-maven-plugin configuration.
<plugin>
    <groupId>org.wildfly.plugins</groupId>
    <artifactId>wildfly-jar-maven-plugin</artifactId>
    <version>${wildfly-jar-maven-plugin.version}</version>
    <configuration>
        <feature-pack-location>
            wildfly-preview@maven(org.jboss.universe:community-universe)#${wildfly.version}
        </feature-pack-location>
        <layers>
            <layer>jaxrs</layer>
        </layers>
        <plugin-options>
            <jboss-fork-embedded>true</jboss-fork-embedded>
        </plugin-options>
    </configuration>
    <executions>
        <execution>
            <goals>
                <goal>package</goal>
            </goals>
        </execution>
    </executions>
</plugin>
The feature-pack-location defines the infrastructure feature it will be used to build the application, and layers specifies which layers will be activated
More details about layers, please refer to the bootable jar documentation and read the Galleon layers chapter.
NOTE: In the feature pack, we use
wildfly-previewto use the Jakarta EE 9 preview.
Run the following command to build the application.
mvn clean package -Pwildfly-bootable
Besides the generic war package built by maven war plugin, there is another jar file with -bootable.jar postfix is built by wildfly-jar-maven-plugin.
Run the following command to start application.
java -jar target\jakartaee9-starter-boilerplate-bootable.jar
Use curl command to test the sample endpoint.
curl -v http://localhost:8080/api/greeting/JakartaEE
NOTE: In the generated bootable jar, by default it sets the application context path to root(“/”).
Deploying to OpenShift
The wildfly-jar-maven-plugin provides out-of-box cloud support. You can use it together with openshift-maven-plugin and build application into docker image from source codes and deploy to the OpenShift cluster.
There are several options to use OpenShift, check the official website for details.
The simplest way is registering RedHat hosted OpenShift cloud, it provides a free Developer sandbox plan. Once you have registered, it will provide you an interactive Web UI for developers and administrators views.
To use openshift-maven-plugin , you have to login firstly. In the OpenShift home page, click the question(?) icon button in the top right area, and click the command line tools menu item. Copy the oc login command line in the opened page. More details, please refer to this guide.
Assume you have installed OpenShift CLI, open a terminal, paste the command to login into the OpenShift cloud.
oc login ...
Next let’s configure the wildfly-jar-maven-plugin and openshift-maven-plugin.
<properties>
    <jkube.generator.from>registry.redhat.io/ubi8/openjdk-11:latest</jkube.generator.from>
</properties>
<build>
    <plugins>
        <plugin>
            <groupId>org.wildfly.plugins</groupId>
            <artifactId>wildfly-jar-maven-plugin</artifactId>
            <version>${wildfly-jar-maven-plugin.version}</version>
            <configuration>
                <feature-pack-location>
                    wildfly-preview@maven(org.jboss.universe:community-universe)#${wildfly.version}
                </feature-pack-location>
                <layers>
                    <layer>cloud-server</layer>
                </layers>
                <excluded-layers>
                    <layer>deployment-scanner</layer>
                </excluded-layers>
                <cloud/>
                <plugin-options>
                    <jboss-fork-embedded>true</jboss-fork-embedded>
                </plugin-options>
            </configuration>
            <executions>
                <execution>
                    <goals>
                        <goal>package</goal>
                    </goals>
                </execution>
            </executions>
        </plugin>
        <plugin>
            <groupId>org.eclipse.jkube</groupId>
            <artifactId>openshift-maven-plugin</artifactId>
            <version>${openshift-maven-plugin.version}</version>
            <executions>
                <execution>
                    <goals>
                        <goal>resource</goal>
                        <goal>build</goal>
                    </goals>
                </execution>
            </executions>
            <configuration>
                <enricher>
                    <config>
                        <jkube-service>
                            <type>NodePort</type>
                        </jkube-service>
                    </config>
                </enricher>
            </configuration>
        </plugin>
    </plugins>
</build>
Here we use a cloud-server layer instead of the former jaxrs, and add another openshift-maven-plugin configuration.
More details about the OpenShift maven plugin, see Eclipse JKube documentation.
Run the following command to deploy application to OpenShift cloud.
mvn clean oc:deploy -Pwildfly-openshift
After it is done, you can watch the pod nodes via the following command.
oc get pods -w
Go to the OpenShift Web UI, and click the Project in the left pane, then you can see all related resources, including Pod Nodes, Services, Routes, etc.
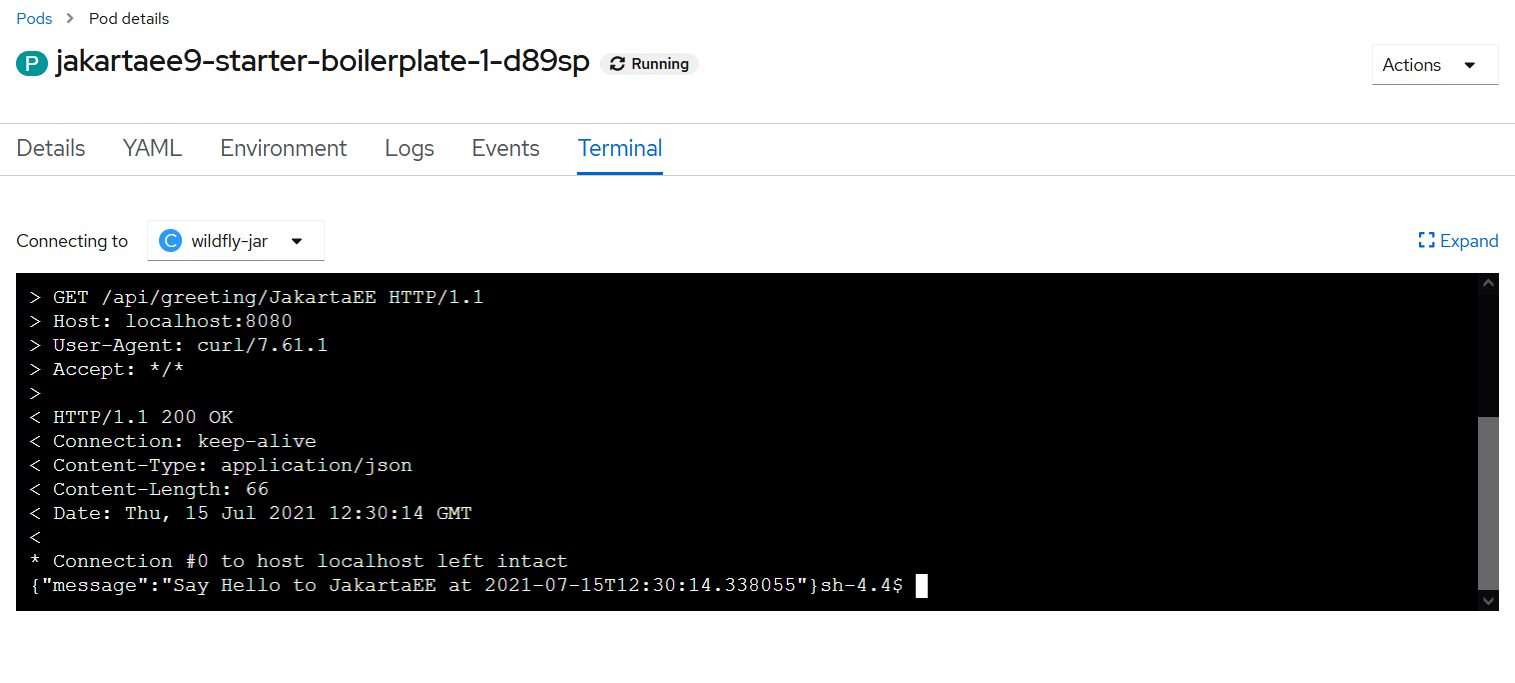
Click Pods, and select jakartaee9-starter-boilerplate-1-xxxxx, then switch to Terminal tab, try to use curl to check our application is working well.
curl -v http://localhost:8080/api/greeting/JakartaEE
The result is similar to the following screen.
Go back to Project view, and click Routes, and select jakartaee9-starter-boilerplate. In the detail page, you can find the external URL of this deployed application(or you can get it via the following command).
Try to access the sample API endpoint through the external URL.
$ oc get route jakartaee9-starter-boilerplate -o jsonpath="{.spec.host}"
jakartaee9-starter-boilerplate-hantsy-dev.apps.sandbox-m2.ll9k.p1.openshiftapps.com

$ curl -v http://jakartaee9-starter-boilerplate-hantsy-dev.apps.sandbox-m2.ll9k.p1.openshiftapps.com/api/greeting/JakartaEE

> GET /api/greeting/JakartaEE HTTP/1.1
> Host: jakartaee9-starter-boilerplate-hantsy-dev.apps.sandbox-m2.ll9k.p1.openshiftapps.com
> User-Agent: curl/7.55.1
> Accept: */*
>
< HTTP/1.1 200 OK
< content-type: application/json
< content-length: 66
< date: Thu, 15 Jul 2021 14:02:46 GMT
< set-cookie: 8f1aeb5fdab055810cd99f63982ad17b=1540c81cbcc1728a7c020191c74f5fa7; path=/; HttpOnly
< cache-control: private
<
{"message":"Say Hello to JakartaEE at 2021-07-15T14:02:46.571707"}
Running Arquillian Tests against Bootable JAR
As mentioned in the last post, WildFly Arqullian project includes a bootable container adapter for testing against the bootable jar.
Add the following dependency in the project pom.xml file.
<dependency>
    <groupId>org.wildfly.arquillian</groupId>
    <artifactId>wildfly-arquillian-container-bootable</artifactId>
    <version>${wildfly-arquillian.version}</version>
    <scope>test</scope>
</dependency>
// jerseys are omitted.
Add wildfly-jar-maven-plugin to build a bootable fat JAR for testing purpose.
<plugin>
    <groupId>org.wildfly.plugins</groupId>
    <artifactId>wildfly-jar-maven-plugin</artifactId>
    <version>${wildfly-jar-maven-plugin.version}</version>
    <configuration>
        <feature-pack-location>
            wildfly-preview@maven(org.jboss.universe:community-universe)#${wildfly.version}
        </feature-pack-location>
        <layers>
            <layer>jaxrs</layer>
            <layer>management</layer>
        </layers>
        <excluded-layers>
            <layer>deployment-scanner</layer>
        </excluded-layers>
        <plugin-options>
            <jboss-fork-embedded>true</jboss-fork-embedded>
        </plugin-options>
    </configuration>
    <executions>
        <execution>
            <goals>
                <goal>package</goal>
            </goals>
        </execution>
    </executions>
</plugin>
Create a new container in the arquillian.xml for this adapter.
<container qualifier="wildfly-bootable-jar" default="true">
    <configuration>
        <property name="jarFile">${bootable.jar}</property>
        <property name="allowConnectingToRunningServer">false</property>
        <property name="managementAddress">127.0.0.1</property>
        <property name="managementPort">9990</property>
        <property name="waitForPorts">9990</property>
        <property name="waitForPortsTimeoutInSeconds">8</property>
    </configuration>
</container>
Define a system wide property bootable.jar in the configuration of maven failsafe plugin .
 <plugin>
     <artifactId>maven-failsafe-plugin</artifactId>
     <version>${maven-failsafe-plugin.version}</version>
     <configuration>
         <systemPropertyVariables>
             <bootable.jar>${project.build.directory}/${project.artifactId}-bootable.jar
             </bootable.jar>
             <arquillian.launch>wildfly-bootable-jar</arquillian.launch>
             <java.util.logging.manager>org.jboss.logmanager.LogManager</java.util.logging.manager>
         </systemPropertyVariables>
     </configuration>
</plugin>
Now run the tests using the following command.
mvn clean verify -Parq-wildfly-bootable-jar
Grab the example codes from my Github.